Many of you may be wondering that where this tool can be helpful. Okay, let me explain this in easy way. Sometimes, we’ve problem in our computer. Say you’re unable to install any game or software and you know the correct source of problem. Now to troubleshoot it, you can mail the report to any specialist or friend so that it can suggest you proper solutions for it. This report can be sent easily with the help of this tool. It will include all step by step instructions along with screenshots. Viewer can also watch the slide show to get everything sequence wise.
One the other hand, you can also use this tool to save your online payment information for future use. Last but not least, this tool can also be used by lazy bloggers. Though I am not one of them. But if you’re a blogger then you can use it to get tutorial steps and screenshots. This means that you don’t need to type much and most importantly, this will reduce your time which was wasted while editing post photos. Wrapping up all these points, problem steps recorder is very useful and you can use it in your day-to-day activities. In today’s tutorial, I will explain you everything about this tool. So lets begin now!
How to Open Problem Steps Recorder
Here comes the main part. To open this tool, follow these instructions –
- First of all, open your computer or laptop ( lol :p Just kidding)
- Now click on start menu button.
- In search box, type “Problem steps recorder” and open first result. Alternatively, you can search for “psr” command inside run dialog box.
- After this, a new window will open. To start recording, click on “Start record” button.
- Now follow the steps you want to capture and when you’ve done, go back to the PSR window and click on “Stop record” button to stop it.
- Finally save dialog box will appear. Here type the file name and choose the location where you want to save it and hit “save” button.
Actually this will create a .zip format file for you record. To view it, unzip the file and then you’ll find a new MHT format file inside it. Simply open it and read your data. Of course, MHT is a web page format so it will open in your browser. Basically, Internet explorer is a default browser for this file format.
Other Features of PSR
Wait! It’s not the end of the tutorial. There are few more amazing features of this tool which you should know. In this section, I will cover all such thing. This will give you better dive in this topic.

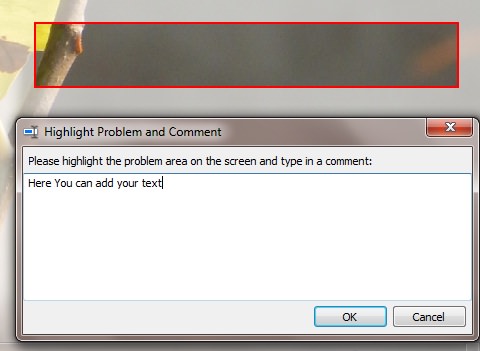
First of all, start with comment feature. While recording, if you type anything will not be recorded. This was done to keep privacy while writing payments details, passwords and other private information. However, if what you type is an important part of your report then you can add it as a comment. To do so, go to PSR window and click on “Add comment” button. Now mark the screen portion where you want to add the comment. This will highlight it in screenshot (See above picture for help). After this, type your text in comment box and click “OK” button. Now proceed with further steps or save it again.
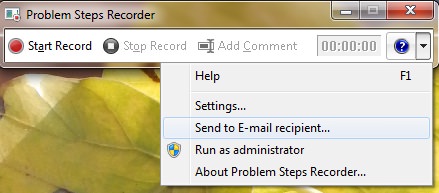
As already mentioned, you can also mail this report to any specialist or friend. Interesting thing is, you don’t need to attach it manually. Simply save your file and then click on drop-down arrow icon on PSR window. From menu list, click on “Send to E-mail recipient” option.

This will open your default E-mail program with already attached file. Now send it to anyone and enjoy. One more important thing is that you can’t send this file until it was saved in your computer. So first save it and then proceed with above steps.
Adjust More Settings
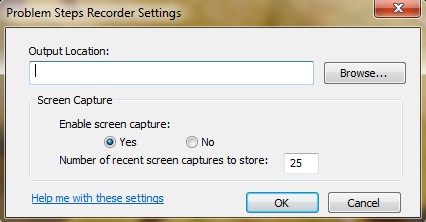
There are few settings which you can adjust as per your own choice. To change them, click on drop-down arrow icon and then click on “Settings” option. After this, a new dialog box will appear. Here you’ll find three options which are described as follows –

- Output Location – This option let you choose default file name and output location for all recording. You can set it by clicking on browser button.
- Enable screen capture – Sometimes you may not want to capture your computer screen. For example, while giving your private information. In such cases, you can manually disable this tool to take screenshots. Simply select “No” option and save it.
- Number of recent screen captures to store – By default, single recording can only capture 25 screenshots. However, you can increase or decrease them to your own value. To do this, type the number of screenshots you want to take and click OK button to apply changes.
Note: All these settings will lasts only for current session i.e., when you close the program, all changes will vanish. Whenever you’ll open this tool again, same default settings will load.
Final Look at Report
Now for this last time, let’s have a look at the report we get from this tool. Simply open the MHT format file which we had extracted above. This report consists of three main parts. First one is problem steps. This will include detailed information about the date/time, comment and screenshots whenever you clicked on screen. The clicked part will be highlighted in screenshots with a color box.
Next comes slide show part. Using this feature you can watch slide show as like you watch power point presentation. I think you don’t need any further explanation for this.
There is an additional details section which include advanced system information like recording session, operating system, UI effect, program etc., This data is for advanced users and programmers so that they can easily figure out the problem you are facing.
P.S – This tool is available in windows 7, windows 8, windows 10 and all later versions only.
So that’s all for today guys. Now I hope that you’ve complete knowledge about this topic. Still having some burning questions in your mind? Let me know in below comment box. Good bye, take care. See you in upcoming posts.