Most of the Android smartphones have in-built file manager app but they are not good enough to satisfy your needs. When it comes to user experience and functioning, ES File Explorer is so far the best file manager app for Android which lets you manage your files more efficiently and easily.
ES File Explorer is much more than just a simple file manager. It is a light-weight app loaded with so many features. You might be using it from a long time but still you don't have used it to its full potential. Apart from managing files, there are many other things it can do for you.
For example, it can send large files between two Android phones (as like SHAREit), backup apps, encrypt data, hide media files from Gallery, play music, browse Internet and much more. Let's discuss all interesting tricks and tips of ES File Explorer in detail.
Sometimes we need to hide private files (photos and videos) in our Android phone to protect them from unauthorized access. ES File Explorer can help you in hiding them. There are two methods you can use -
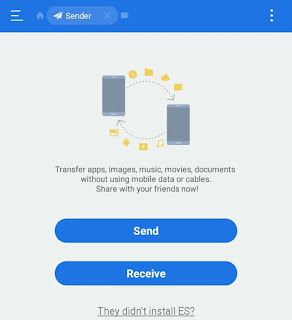
Gone are those days when people use to send files over Bluetooth. Now you can transfer them over Wi-Fi network which is 200 times faster than Bluetooth. As like SHAREit, ES File Explorer can also send large files and apps between two Android phones. This is quite faster and easier method. Here's a step-by-step guide -
First launch ES File Explorer in both devices. Then go to Menu → Network → Sender. In the sender's phone, tap the Send button and choose files. Next, click Send button again. Now tap the Receive button in the receiver's phone simultaneously. Once they connect, file transferring will be started automatically.
You can manage and browse your Android device through computer remotely without connecting them by Data Cable. Here's a step-by-step guide -
You can encrypt sensitive data (such as your private photos, videos and other documents) with password protection. It is more secure way to protect your data from unauthorized access. You can easily encrypt any file or folder with ES File Explorer. First select the files by tapping them for few seconds and then click More → Encrypt option.
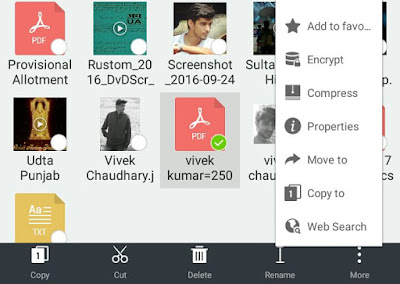
Now type the password and click OK button. The format of encrypted file is ".esloc" and it is saved in the same folder where the original file was saved.
Encrypted data can't be accessed directly and it is hidden from Gallery as well. The only way to open the file is to decrypt it with ES Explorer by entering the password.
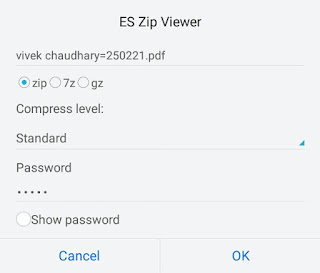
You can also compress multiple files into a single zip file in ES File Explorer. Additionally, you can enable password protection to prevent unauthorised access. Steps are almost same as in above method.
First select the files you want to compress and then click More → Compress option. Now a pop up box will appear. Here choose the compress level, type password and then click OK button. The compressed ZIP file will be saved in the same directory.
A person with access to file manager can easily find anything in your phone. To protect user's privacy, ES File Explorer has a feature which lets you lock itself with a password so that no one can browse files and folders in your phone.
To enable this lock, go to Menu → Settings and tap the Password Settings option. Now tick mark "App protection" button and set the password. That's it.
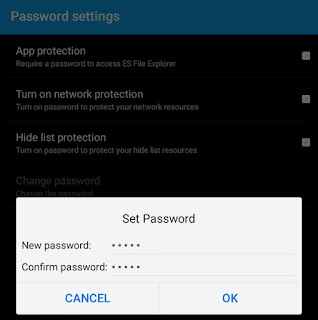
Remember, you have just locked ES File Explorer app. Internal memory and SD card content can still be accessed from other places.
ES File Explorer provides an easy way to analyze space of your phone's internal memory and SD card. It gives geeky stats about how space is occupied by various files. To run a full memory scan, go to Menu → Tools → SD card analyst.
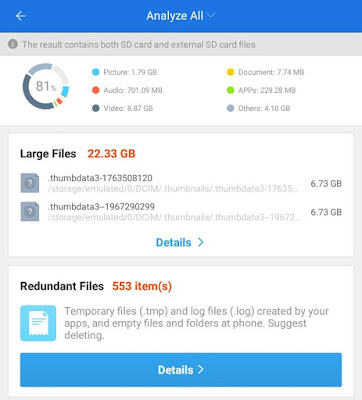
Once scanning is complete, you can easily find duplicate, large and redundant files in your phone. You can also scan particular folder or directory by tapping the Analyze button at the top-right corner.
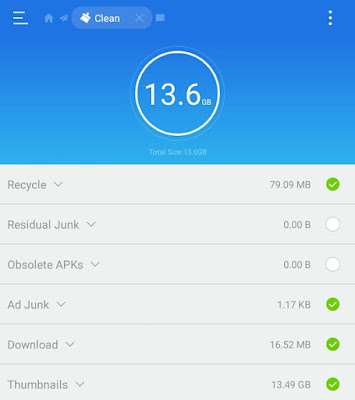
Every Android phone is full of cache data and junk files which occupy unnecessary space. You can clear them with ES Cleaner tool. Simply go to Menu → Tools → Cleaner. Now scanning will start. After that, tick mark the items you want to delete and then tap Clean Now button.
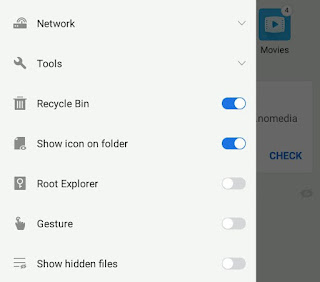
Everything you delete on Android is deleted permanently. There is no recycle bin to restore them. ES brings a Windows-like experience to Android. Now you can put deleted files in Recycle Bin so that they can be restored later, if required. To enable this feature, go to Menu and switch on the button next to the Recycle Bin option.
To see deleted files, tap the Recycle Bin button on home screen. You should clear them time to time because they occupy unnecessary space. Note that, this feature is limited to ES Explorer only. All files you will delete outside ES will be deleted permanently, as usual.
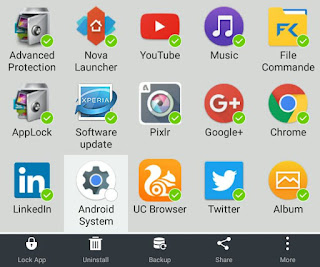
Many times we need to extract the apk file of installed apps in our phone. If you have ES Explorer, there is no need to install any third-party application for this task. Simply go to Menu → Library → APPS. Now select the applications whose apk you want to extract and then tap the Backup option from the bottom menu.
It is quite easy to uninstall an app on Android but what if you want to uninstall multiple apps and you are running out of time. Here's a simple trick -
Again go to Menu → Library → APPS. Now select the applications you want to uninstall and then tap the Uninstall button from the bottom menu. All apps will start uninstalling one by one.
There is an in-built music player app in ES File Explorer which can play any type of video and audio. Every time when you open any media file, you will be asked to select the app. So select ES Media Player and enjoy. You can also browse media files from Library.
Similar to media player, there is an in-built web browser tool in ES Explorer which you can use to access Facebook, Google, YouTube and other sites. Of course, it's not a substitution to Facebook app or browser like Google Chrome and UC Browser. But you can use it at times when someone asks you to login to their account and you don't want to sign out yours.
So these are some useful tricks and tips of ES File Explorer. So what are you waiting for? Go and try them now. If you would like to add something, feel free to share it in the comments below.

ES File Explorer is much more than just a simple file manager. It is a light-weight app loaded with so many features. You might be using it from a long time but still you don't have used it to its full potential. Apart from managing files, there are many other things it can do for you.
For example, it can send large files between two Android phones (as like SHAREit), backup apps, encrypt data, hide media files from Gallery, play music, browse Internet and much more. Let's discuss all interesting tricks and tips of ES File Explorer in detail.
1. Hide media files from Gallery
Sometimes we need to hide private files (photos and videos) in our Android phone to protect them from unauthorized access. ES File Explorer can help you in hiding them. There are two methods you can use -
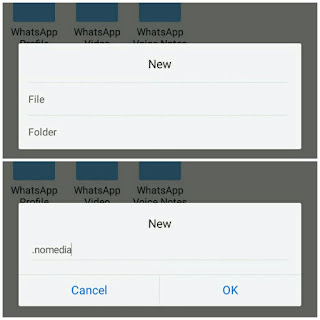
- Create nomedia file - You can hide any folder from Gallery by placing a nomedia file in it. First launch the ES File Explorer app and go to the folder you want to hide. Tap the menu button (three dots at the top-right corner) and click New → File. Now name this file as ".nomedia" and then save it.
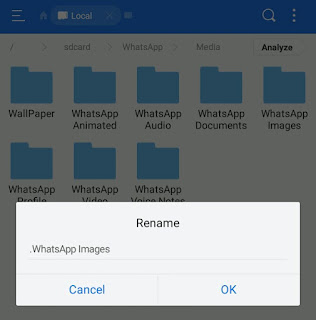
- Rename folder - Another way to hide folder in your Android phone is by renaming it. All you have to do is, just add dot symbol (.) before its name. For example, if you want to hide WhatsApp folder, then rename it to ".WhatsApp".
2. Send files between two Android phones
Gone are those days when people use to send files over Bluetooth. Now you can transfer them over Wi-Fi network which is 200 times faster than Bluetooth. As like SHAREit, ES File Explorer can also send large files and apps between two Android phones. This is quite faster and easier method. Here's a step-by-step guide -
First launch ES File Explorer in both devices. Then go to Menu → Network → Sender. In the sender's phone, tap the Send button and choose files. Next, click Send button again. Now tap the Receive button in the receiver's phone simultaneously. Once they connect, file transferring will be started automatically.

3. Manage your phone through computer
You can manage and browse your Android device through computer remotely without connecting them by Data Cable. Here's a step-by-step guide -
- First connect your phone and computer on same Wi-Fi network. If no connection is available, use Wi-Fi Hotspot feature to connect them.
- Now open ES File Explorer and go to Menu → Network → Remote Manager. Turn on this service and it will display a FTP URL.
- Enter this URL in browser on your computer and browse your phone's data.
4. Encrypt files with password protection
You can encrypt sensitive data (such as your private photos, videos and other documents) with password protection. It is more secure way to protect your data from unauthorized access. You can easily encrypt any file or folder with ES File Explorer. First select the files by tapping them for few seconds and then click More → Encrypt option.

Now type the password and click OK button. The format of encrypted file is ".esloc" and it is saved in the same folder where the original file was saved.
Encrypted data can't be accessed directly and it is hidden from Gallery as well. The only way to open the file is to decrypt it with ES Explorer by entering the password.
5. Compress and ZIP files
You can also compress multiple files into a single zip file in ES File Explorer. Additionally, you can enable password protection to prevent unauthorised access. Steps are almost same as in above method.
First select the files you want to compress and then click More → Compress option. Now a pop up box will appear. Here choose the compress level, type password and then click OK button. The compressed ZIP file will be saved in the same directory.

6. Lock ES File Explorer app
A person with access to file manager can easily find anything in your phone. To protect user's privacy, ES File Explorer has a feature which lets you lock itself with a password so that no one can browse files and folders in your phone.
To enable this lock, go to Menu → Settings and tap the Password Settings option. Now tick mark "App protection" button and set the password. That's it.

Remember, you have just locked ES File Explorer app. Internal memory and SD card content can still be accessed from other places.
7. Analyze space & clean junk files
ES File Explorer provides an easy way to analyze space of your phone's internal memory and SD card. It gives geeky stats about how space is occupied by various files. To run a full memory scan, go to Menu → Tools → SD card analyst.

Once scanning is complete, you can easily find duplicate, large and redundant files in your phone. You can also scan particular folder or directory by tapping the Analyze button at the top-right corner.
Every Android phone is full of cache data and junk files which occupy unnecessary space. You can clear them with ES Cleaner tool. Simply go to Menu → Tools → Cleaner. Now scanning will start. After that, tick mark the items you want to delete and then tap Clean Now button.

8. Add Recycle Bin
Everything you delete on Android is deleted permanently. There is no recycle bin to restore them. ES brings a Windows-like experience to Android. Now you can put deleted files in Recycle Bin so that they can be restored later, if required. To enable this feature, go to Menu and switch on the button next to the Recycle Bin option.

To see deleted files, tap the Recycle Bin button on home screen. You should clear them time to time because they occupy unnecessary space. Note that, this feature is limited to ES Explorer only. All files you will delete outside ES will be deleted permanently, as usual.
9. Extract apk from installed apps
Many times we need to extract the apk file of installed apps in our phone. If you have ES Explorer, there is no need to install any third-party application for this task. Simply go to Menu → Library → APPS. Now select the applications whose apk you want to extract and then tap the Backup option from the bottom menu.
10. Uninstall multiple apps simultaneously
It is quite easy to uninstall an app on Android but what if you want to uninstall multiple apps and you are running out of time. Here's a simple trick -
Again go to Menu → Library → APPS. Now select the applications you want to uninstall and then tap the Uninstall button from the bottom menu. All apps will start uninstalling one by one.

11. Use ES Explorer as media player
There is an in-built music player app in ES File Explorer which can play any type of video and audio. Every time when you open any media file, you will be asked to select the app. So select ES Media Player and enjoy. You can also browse media files from Library.
11. Use ES Explorer as browser
Similar to media player, there is an in-built web browser tool in ES Explorer which you can use to access Facebook, Google, YouTube and other sites. Of course, it's not a substitution to Facebook app or browser like Google Chrome and UC Browser. But you can use it at times when someone asks you to login to their account and you don't want to sign out yours.
So these are some useful tricks and tips of ES File Explorer. So what are you waiting for? Go and try them now. If you would like to add something, feel free to share it in the comments below.

This comment has been removed by a blog administrator.
ReplyDeletethank you for sharing Es File Explorer Tips & Tricks
ReplyDelete